-
Shop
- Adidas
- Advanced Technologies
- Apple Accessories
- Armani Fashion
- Arts, Crafts & Hobbies
- Beauty & Skincare
- Best-Sellers
- Calvin Klein Fashion
- Car Accessories
- Dating & Social Skills
- Drones
- Education & Learning
- Electronics
- Emotional Intelligence
- Family & Parenting
- Fashion
- Alexander McQueen Fashion
- Bags
- Bags & Wallets
- Balenciaga Fashion
- Belts
- Blazers
- Blouses & Shirts
- Bottega Veneta Fashion
- Bottoms
- Brunello Cucinelli Fashion
- Burberry Fashion
- Chanel Fashion
- Chloé Fashion
- Dior Fashion
- Dolce & Gabbana Fashion
- Dresses
- Etro Fashion
- Fendi Fashion
- Gucci Fashion
- Hats & Hair Accessories
- Hoodies & Sweatshirts
- Jacquemus Fashion
- Jewelry
- Jil Sander Fashion
- Jimmy Choo Fashion
- Kiton Fashion
- Luggage
- Luggage Bags
- Men's Fashion
- Miu Miu Fashion
- Off-White Fashion
- Outerwear
- Prada Fashion
- Rick Owens Fashion
- Saint Laurent Fashion
- Scarves
- Shoes
- Skirts
- Socks & Tights
- Sunglasses
- Sweaters & Cardigans
- The Row Fashion
- Tom Ford Fashion
- Tops & Shirts
- Trousers
- Valentino fashion
- Valentino Garavani Fashion
- Versace Fashion
- Vivienne Westwood fashion
- Watches
- Fashion Accessories
- Finance & Career
- Fitness & Movement
- Gadgets
- Gift Ideas
- Gifts
- Guess Fashion
- Health & Beauty
- Health & Wellness
- Home & Garden
- Home & Lifestyle
- Home Supplies
- Hormone & Women’s Health
- Kids & Babies
- Massagers
- Mindset
- Mindset & Personal Growth
- Nike Fashion
- Nutrition & Healthy Eating
- Patio, Lawn & Garden
- Personal Growth
- Pet Care
- Pet Supplies
- Pets
- Productivity
- Relationships & Social Confidence
- Samsung Accessories
- Self-Care & Mental Well-Being
- Sleep & Rest
- Sport
- Sport & Outdoors
- Style & Fashion
- Summer 2025 Fashion Collection
- Super Deals
- Tesla Accessories
- Tommy Hilfiger Fashion
- Travel
- Travel & Outdoors
- Video Games
- Wealth
70 Mixed-Color Plant Labels: Color-Code Pots & Beds
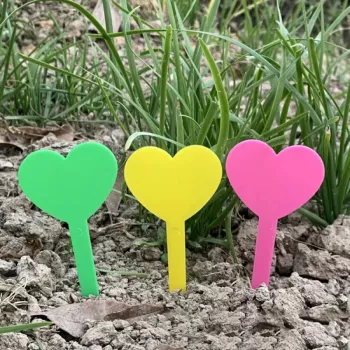
70 Mixed-Color Plant Labels for Potted Plants and Garden Beds
Keeping seedlings, cuttings, and mature plants identified saves time and prevents mix-ups during watering, fertilizing, and harvest. Mixed-color plant labels make it simple to mark varieties and create a quick color-coding system across pots, trays, and outdoor beds—especially when you’re juggling multiple sowing dates, similar-looking seedlings, or a growing indoor collection.
For additional best practices on plant care and garden planning, you can also reference the Royal Horticultural Society (RHS) gardening advice and the University of Minnesota Extension gardening resources.
What These Mixed-Color Plant Labels Are Made For
- Labeling seedlings and starts in cell trays, nursery pots, and propagation domes
- Tracking varieties, planting dates, and germination notes for vegetables, herbs, and flowers
- Organizing indoor houseplants and succulents by care needs (light, water, feeding schedule)
- Color-coding sections of a garden bed or groups of containers to reduce confusion
- Marking cuttings and swaps so plant names stay with the plant from day one
Even experienced growers get tripped up when multiple trays share the same “tomato” label or when basil and oregano seedlings look identical for weeks. A consistent label system is an easy way to protect your time—and your harvest.
Smart Ways to Use Color-Coding
- By plant type: one color for herbs, another for leafy greens, another for flowers
- By timeline: one color per sowing week to quickly spot what’s newest
- By location: match label colors to zones (porch, windowsill, greenhouse shelf, raised bed)
- By care level: drought-tolerant vs. moisture-loving plants for faster watering routines
- By experiment: use a separate color for test batches (different soil mix, light level, fertilizer)
Example color-coding system for quick plant organization
| Color group | Best for | What to write on the label |
|---|---|---|
| Color A | Seedlings and starts | Variety + sow date |
| Color B | Transplants | Transplant date + spacing note |
| Color C | Houseplants | Light level + watering interval |
| Color D | Trial plants | Soil/fertilizer note + result |
| Color E | Perennials | Year planted + pruning note |
A small, repeatable system like this helps you “read” your garden at a glance—especially during busy weeks when watering and transplanting happen fast.
What to Write So Labels Stay Useful All Season
- Keep it short: plant name/variety, date, and one key note (e.g., “pinch at 6 in.”)
- Use consistent abbreviations: for example, “TP” for transplant, “G” for germinated
- For vegetables: include days-to-maturity or an expected harvest window
- For perennials: include year planted and bloom color to avoid repeat purchases
- For indoor plants: include last repot date or fertilizer schedule to prevent overfeeding
One practical approach is a “3-part label”: Variety + Date + One Action. That gives you a fast reminder without turning the tag into a notebook page.
Choosing a Marker That Won’t Fade or Smear
- Use a garden marker or paint marker for outdoor beds where sun and watering are intense
- Permanent marker works well for many indoor pots, but can fade under strong UV over time
- Let ink dry fully before watering to reduce smudging
- If rewriting is needed, test erasability on one label first (some inks stain plastic)
- For long-term labels, consider writing both the plant name and a shorthand code (as backup)
Common writing tools and where they perform best
| Writing tool | Best use | Watch out for |
|---|---|---|
| Garden marker | Outdoor pots and beds | May still fade after long sun exposure |
| Permanent marker | Indoor pots and short-term labeling | Can blur if watered immediately |
| Paint marker | Long-term outdoor labeling | Needs drying time; thicker line |
| Pencil/grease pencil | Temporary notes and quick changes | May rub off with handling |
Placement Tips for Clear, Readable Labels
- Place labels where they can be read without lifting pots; keep the writing facing the aisle or front
- Avoid pushing labels directly against the main stem to prevent rubbing or damage
- In windy outdoor beds, insert labels deep enough to reduce wobble and soil splash
- For dense trays, align labels in the same corner so scanning is fast
- If pests or pets disturb pots, place labels slightly inside the rim for extra protection
Care, Reuse, and Storage Between Seasons
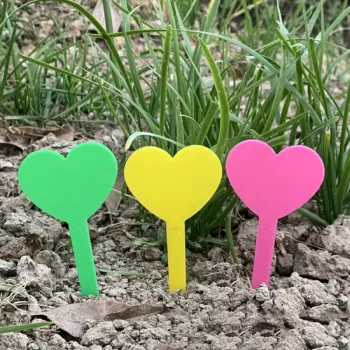
Product Option: 70Pcs Mixed Color Plant Labels for Potted Plants & Garden
70Pcs Mixed Color Plant Labels for Potted Plants & Garden
For cooler mornings in the garden or greenhouse, a light layer can help you stay comfortable while labeling, watering, and transplanting: Vans Women’s Pink Hooded Jacket
Quick checklist before buying plant labels
| Consideration | Why it matters | Quick tip |
|---|---|---|
| Quantity | Labels disappear fast across trays and pots | Plan for extras for replacements |
| Color variety | Enables fast sorting and fewer mix-ups | Assign a meaning to each color |
| Writing durability | Outdoor sun and watering can fade ink | Choose the right marker for conditions |
| Reuse plan | Saves money season to season | Clean and store by category |
FAQ
What’s the best way to keep plant label writing from fading outdoors?
Use a UV- and water-resistant garden marker or paint marker, and let the ink fully dry before watering. Position labels where overhead sprinklers don’t constantly blast the writing, and refresh key labels mid-season if they’re in intense sun.
Can these labels be reused for a new planting season?
Yes—rinse off soil, wash as needed, and dry completely before stacking for storage. If you need to remove old ink, test rubbing alcohol on one label first, and retire any labels that are cracked or warped.
How should plant labels be placed in pots so they stay readable and don’t harm the plant?
Insert the label near the pot edge rather than against the main stem, and keep the writing facing outward for quick scanning. For outdoor containers and beds, push the label deeper to prevent wobbling in wind and to reduce soil splash that can obscure text.
Recommended for you
Was this article helpful?
Yes
No







Leave a comment